

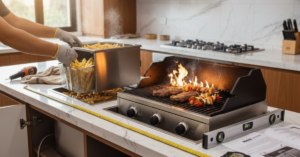
Built-in Deep Fryer Installation: 7 Smart Steps for DIY and Professional Setup
Installing a built-in deep fryer sounds simple until you’re standing in your Karachi kitchen with a cutout that’s slightly off, a plug point that isn’t where you need it, and the real question: “Is this actually safe?” This Built-in Deep Fryer Installation guide is written for Pakistani homes—apartments, portion houses, and small-to-medium kitchens—where ventilation, electrical load, and space planning matter as much as the fryer itself.
Whether you’re considering DIY deep fryer installation or you want a professional deep fryer setup, the goal is the same: correct fitting, safe electrical connection, proper alignment, and accident prevention. If you follow the right steps (and avoid common mistakes), your indoor deep fryer setup can be clean, stable, and long-lasting—without damaging cabinets or risking overheating.
You’ll also find practical points on space measurement for fryer, placement rules, and when it’s smarter to call a technician. And where it makes sense, you’ll see how Xperts can support you with appliance selection, built-in fitting guidance, and compatible accessories—so the information naturally leads to a confident buying decision.
Built-in Deep Fryer Installation Requirements
Before you start installing built-in deep fryer units, pause and confirm you’re set up correctly. Most installation failures happen because people jump straight into cutting and wiring.
1) Confirm your kitchen type and ventilation (Pakistan/Karachi reality)
Karachi kitchens often deal with humidity and limited airflow. Deep frying produces heat, steam, and oil vapors—so your appliance setup must support ventilation.
Appliance setup checklist:
- Working exhaust hood or decent cross-ventilation
- Heat-resistant surfaces around the cutout
- A plan for oil smell management (filters + cleaning routine)
This isn’t only comfort—it’s also safe kitchen installation.
2) Check measurements twice (space measurement for fryer is non-negotiable)
“Almost fit ho jayega” is where cabinets get ruined.
Space measurement for fryer — what to measure:
- Cutout width and depth (exact)
- Countertop thickness (many built-in models require a range)
- Vertical clearance under the countertop (for body + wiring + airflow)
- Side clearance from walls/cabinets (heat safety)
- Rear clearance for ventilation and cable routing
This is the foundation of built-in appliance installation and kitchen appliance fitting.
3) Decide DIY vs professional fitting (be honest about your skills)
Many people ask: “Can I install it myself?” Sometimes yes—but not always safely.
DIY deep fryer installation is usually okay if:
- The cutout already exists and matches the fryer spec
- Electrical point is correct, grounded, and properly rated
- You’re not modifying wiring or adding a new circuit
Professional fitting is strongly recommended if:
- You need new wiring, breakers, or load calculation
- You’re unsure about earthing/grounding
- The unit requires hardwiring (common in some builds)
- You need cabinet modification
This is where Menas Xperts can help: if you purchase through them, you can often get guidance on model specs, cutout dimensions, and recommended installation approach for your kitchen.
Step-by-Step Installation
Below is a practical fryer installation guide for a safe indoor deep fryer installation at home. Use it as a methodical checklist.
Step 1: Read the manual and confirm model requirements
This sounds basic, but it prevents the biggest errors.
Check:
- Cutout dimensions
- Electrical rating (voltage, amperage, plug type)
- Required clearances
- Ventilation needs
- Whether it supports built-in or “countertop deep fryer fitting” style
Different brands have different tolerances, so treat this as your “source of truth” for electric deep fryer installation.
Step 2: Mark the cutout cleanly (don’t eyeball it)
Use tape, pencil, and a measuring tool. Mark the cutout per spec.
Installation tips:
- Keep corners neat (avoid weak, jagged edges)
- Confirm the unit’s lip/trim covers the cut line
- Double-check alignment with cabinets below
This step directly impacts appliance alignment.
Step 3: Prepare the cabinet cavity for airflow and heat
Built-in units generate heat. Cabinets must not become a heat trap.
Do:
- Ensure an air gap below and around the fryer body if required
- Remove items that will melt or store away flammables
- Use heat-resistant liners (if your design supports it)
This is part of built-in deep fryer positioning done correctly.
Step 4: Dry-fit first (before final placement)
Place the fryer into the cutout without connecting anything. Confirm:
- It sits flat
- The trim covers the cutout
- No cable pinches
- No contact with cabinet edges that could rub over time
This is the most overlooked step in indoor deep fryer appliance install.
Step 5: Secure the unit (as per manufacturer clamps/brackets)
Most built-in models use clamps/brackets underneath.
Kitchen appliance fitting rule:
- Tighten evenly
- Do not over-tighten (can crack countertop or warp alignment)
Proper securing prevents movement and reduces oil splash risk.
Step 6: Connect drainage (only if your model supports it)
Some built-in deep fryers include oil drainage systems. If yours does:
- Confirm the drain path is secure
- Use heat-safe containers
- Keep drainage accessible (not buried behind fixed panels)
This improves maintenance and reduces spill risks.
Step 7: Final inspection before power
Before any power connection:
- Check there are no sharp edges touching cables
- Confirm unit sits level
- Confirm surrounding surfaces are clean and dry
Now you’re ready for the electrical connection stage.
Space and Placement Tips
This section supports fryer placement decisions so your unit is safe and convenient in Pakistani kitchens.
Keep it away from high-traffic zones
Deep frying + kids + narrow kitchen paths is a real risk.
Best practice:
- Avoid installation beside doorways or where people squeeze past
- Keep a clear working zone in front
This is a core principle of safe kitchen installation.
Place it near ventilation (not far from it)
If your exhaust is on one side of the kitchen, install closer to that zone. It reduces smell spread—very relevant in Karachi apartments.
Avoid installing next to water sources
Sink proximity increases splash risk. If it must be near:
- Maintain a safe gap
- Use splash guards
- Be strict with “dry hands before handling oil” rules
This is a practical installation safety rule, not theory.
Electrical Connection Guide
Electrical planning is where safe installs succeed or fail. Karachi homes often have mixed wiring quality and shared loads, so do not guess.
Understand basic electrical requirements
Your manual will specify:
- Voltage and frequency
- Power draw (watts) or current (amps)
- Plug type / hardwire requirement
- Grounding requirement
Electrical connection rule:
If you don’t fully understand the rating, use a qualified electrician. This is especially important for electric deep fryer fitting.
Dedicated circuit and grounding (recommended)
A deep fryer is a high-heat appliance. For many kitchens, a dedicated circuit is safest.
Professional fitting considerations:
- Proper breaker sizing
- Good earthing/ground
- Correct wire gauge
- Avoiding overloaded extension boards
This is one reason many people choose professional deep fryer setup even if they can do the physical fitting themselves.
Avoid extension cords and cheap adapters
This is one of the biggest Karachi household mistakes.
For safety and performance:
- Use a proper rated socket
- Avoid loose or sparking connections
- Ensure plug insertion is tight and stable
If Menas Xperts is supplying the appliance, they can advise on the correct connection method and recommended load handling for your selected model.
Safety Precautions During Installation
Safety Precaution 1: Power OFF during fitting (always)
Never work around wiring with power live. Turn off the relevant breaker.
Safety Precaution 2: No oil until your “dry run” passes
Do a dry test first:
- Power on
- Confirm heating indicators
- Confirm no error codes
- Confirm no smell of wiring or overheating
Then power off, let it cool, and re-check seating and alignment.
Safety Precaution 3: Level matters (prevents splashing and uneven frying)
If the fryer is not level:
- Oil sits unevenly
- Splash risk increases
- Cooking results become inconsistent
Use a level tool before final tightening—this is simple but important appliance alignment.
Safety Precaution 4: Keep flammables away from the cavity
Common Karachi kitchen storage includes plastic bags, cloth, paper towels, spice packets. Do not store these under/around the fryer cavity.
This is the most practical accident prevention step during indoor deep fryer setup.
Conclusion
A safe Built-in Deep Fryer Installation is not about rushing a cutout and plugging it in—it’s about correct measurement, correct placement, correct electrical connection, and clear safety checks. If you follow this built-in deep fryer installation guide, you’ll reduce smoke issues, avoid cabinet damage, prevent electrical hazards, and make your indoor fryer setup reliable for everyday Pakistani cooking.
If you want a smoother experience—especially in Karachi where wiring load and ventilation vary from home to home—Xperts can help you select the right built-in model, guide you on fitment and positioning, and recommend compatible accessories. That way, your installation is not only safe, it’s also built for long-term performance and easy maintenance.
FAQs (People Also Ask)
How do I install a built-in deep fryer?
A proper built-in deep fryer installation starts with correct measurements, a clean cutout, safe placement, and proper securing. After that, you connect power according to the manual, confirm grounding, and do a dry test before adding oil. If wiring changes are needed, use professional fitting.
Can I install it myself?
Yes, DIY deep fryer installation is possible if the cutout is correct and the electrical point is already safe, grounded, and rated. If you need new wiring, hardwiring, or breaker changes, it’s safer to choose a professional deep fryer setup.
How much space is needed?
Space depends on your model. You must measure cutout dimensions, countertop thickness, cavity clearance underneath, and safe side/rear clearance for heat and wiring. Accurate space measurement for fryer prevents cabinet damage and overheating issues.
What are the electrical requirements?
Electrical requirements vary by model, but most require a properly rated grounded connection. High-power appliances may need a dedicated circuit and correct breaker sizing. If you are unsure, consult a qualified electrician—this is essential for safe electric deep fryer installation.
How to prevent accidents during installation?
Prevent accidents by turning off power at the breaker, keeping the unit level and secure, avoiding water proximity, ensuring ventilation, and doing a dry test before adding oil. Avoid extension cords and loose adapters. These steps support safe kitchen installation.